The kitchen island has evolved from a simple prep space into the beating heart of modern homes – a place where families gather for breakfast, kids tackle homework, and friends congregate during dinner parties. For homeowners drawn to warmth and authentic character, a rustic kitchen island offers the perfect blend of timeless charm and rock-solid functionality that can anchor your entire kitchen design.
But here’s the thing about rustic style: it’s not just about throwing some distressed wood together and calling it a day. Creating an authentic rustic kitchen island that actually works for your busy family life requires thoughtful consideration of materials, sizing, placement, and those finishing touches that make all the difference. Whether you’re dreaming of farmhouse charm, industrial edge, or cozy cabin vibes, the right approach can transform your kitchen into a space that feels both beautifully curated and genuinely lived-in.
I’ve spent years helping busy families create quick, impactful kitchen updates that actually fit their real lives – no months-long renovations or sky-high budgets required. These 19 essential tips will walk you through everything from selecting materials with genuine character to styling your finished island for maximum impact. Let’s dive in and create a rustic kitchen island that becomes the true centerpiece of your home.
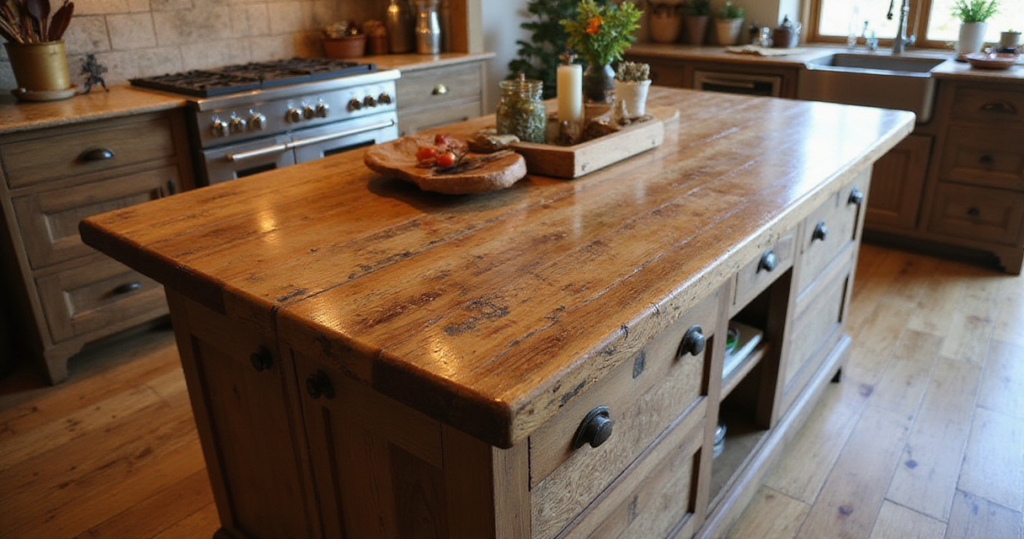
1. Choose Reclaimed Wood for Instant Character
Starting with reclaimed wood isn’t just about jumping on a trend – it’s about bringing genuine history and soul into your kitchen. When you run your hands across barn wood that’s weathered decades of seasons or factory flooring that’s supported generations of workers, you’re adding a story that no new lumber can replicate. The nail holes, saw marks, and natural patina create visual interest that makes your island feel like a treasured family heirloom from day one.
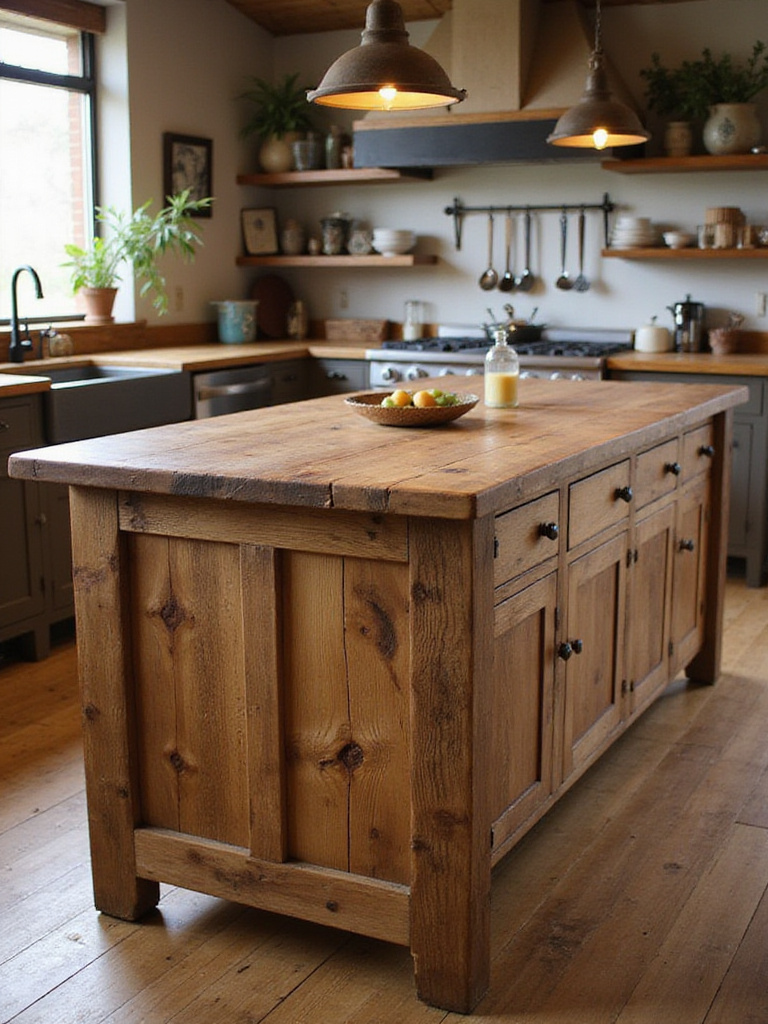
Beyond the undeniable character factor, reclaimed wood offers practical advantages that busy families will appreciate. This aged lumber has already done its shifting and settling, making it incredibly stable for heavy-use kitchen applications. Plus, you’re making an eco-conscious choice that diverts quality timber from landfills while reducing demand for new forest harvesting. Just make sure to source from reputable suppliers who properly grade, clean, and seal the wood for kitchen use – the last thing you want is bringing unwanted guests like insects into your cooking space.
- Best reclaimed wood sources: Barn siding, factory flooring, old beams, and deconstructed building materials
- Essential prep steps: Professional kiln-drying, de-nailing, and food-safe sealing
- Popular species: Oak, pine, chestnut, and heart pine for authentic rustic appeal
“The true magic happens when you embrace those imperfections – every mark tells a story that makes your island completely unique,” notes furniture restoration expert Maria Santos.
Look closely and you’ll notice the subtle texture variations that make distressed finishes the perfect complement to reclaimed wood’s natural character.
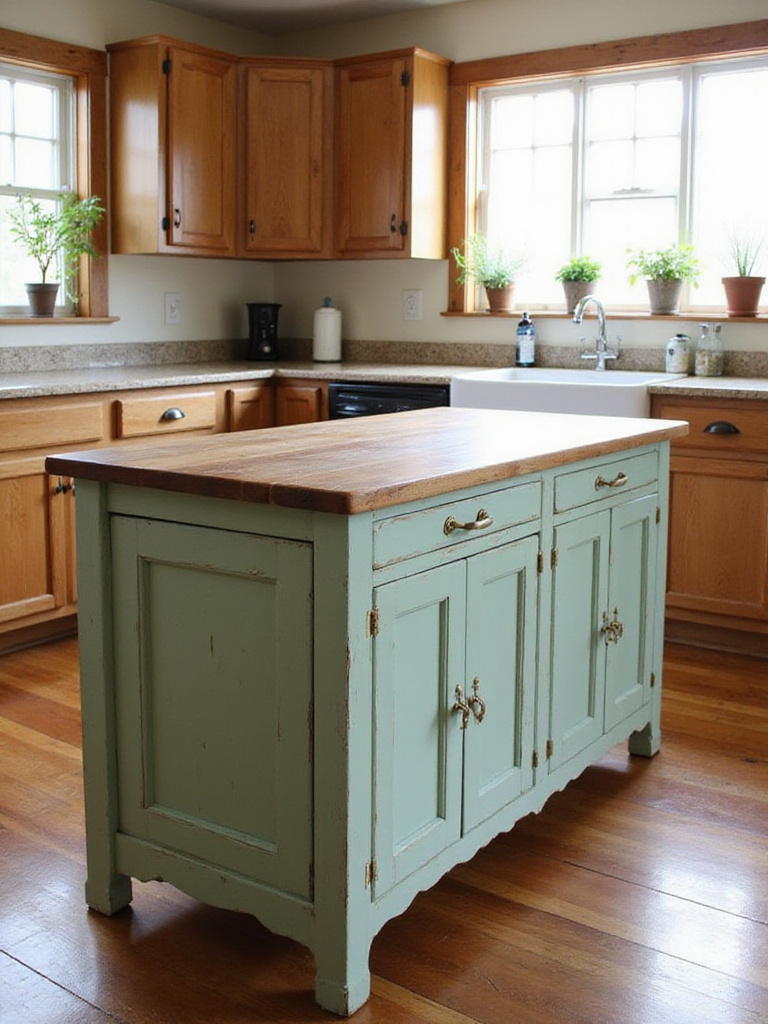
2. Select Distressed Finishes for Authentic Appeal
Distressed finishes are your secret weapon for creating that perfectly imperfect look that defines authentic rustic style. This isn’t about randomly beating up your furniture – it’s about strategically applying techniques like edge sanding, paint layering, and selective wearing to mimic the natural aging process. The best part? Your island will actually look better as it accumulates the inevitable dings and scratches of daily family life, since new imperfections just blend seamlessly into the existing character.
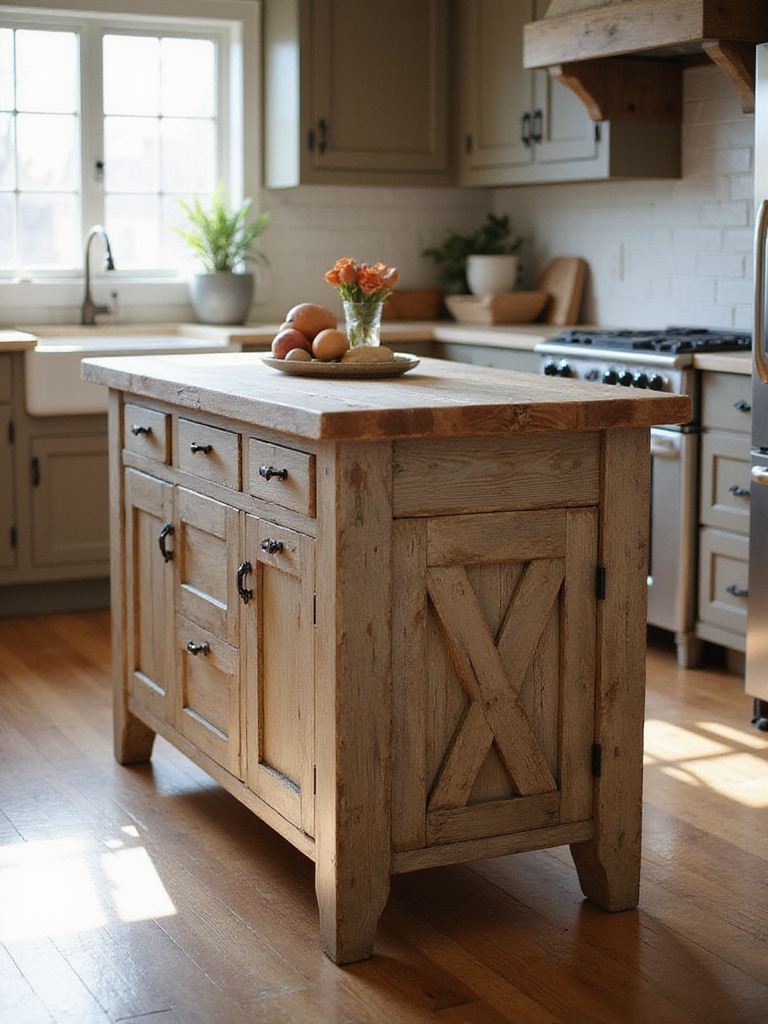
The practical benefits extend far beyond aesthetics. Distressed finishes are incredibly forgiving in busy kitchens where spills happen and kids don’t always use coasters. That coffee ring or homework pencil mark that would be a disaster on a pristine surface becomes just another layer of lived-in charm on a properly distressed piece. Focus your distressing efforts on areas that would naturally receive wear – edges, corners, and high-touch spots – for the most authentic results.
- Key distressing techniques: Sanding through paint layers, strategic denting, and crackle finishes
- Best paint types: Chalk paint, milk paint, and layered latex for optimal distressing results
- Critical final step: Protective topcoat suitable for kitchen use to seal the finish
“The goal is creating layers of visual narrative, not just random damage,” explains heritage furniture designer Tom Richardson. “Each mark should feel intentional and natural.”
The interplay between distressed wood and metal creates the perfect foundation for adding industrial rustic elements.
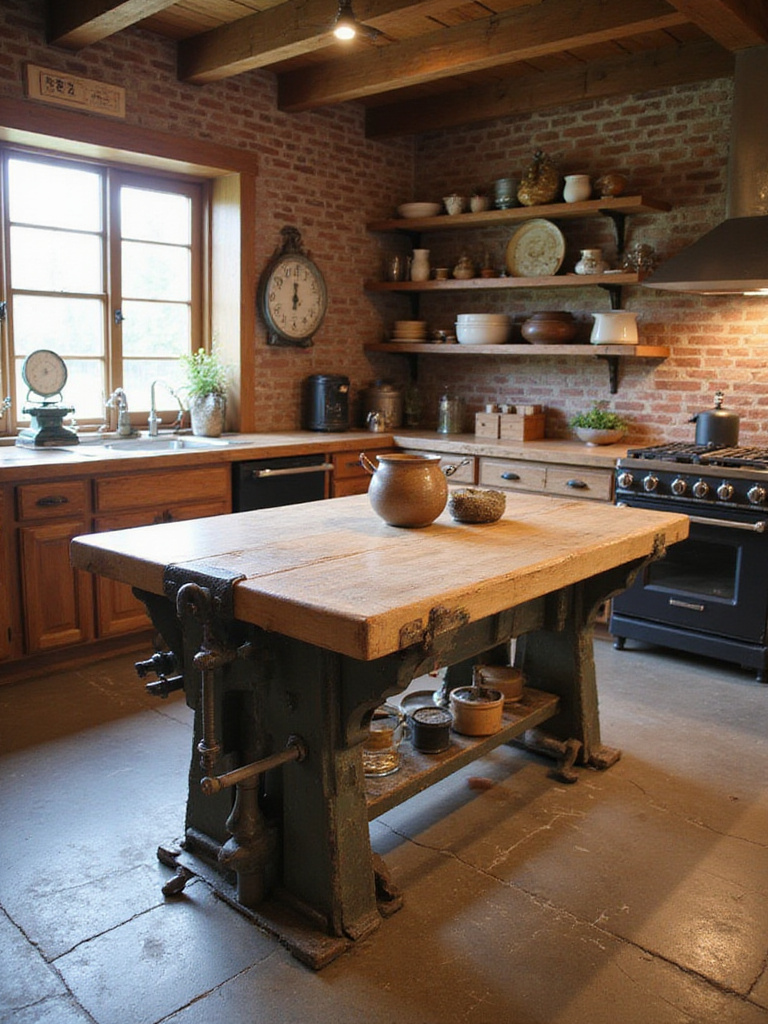
3. Add Metal Accents for Industrial Edge
Incorporating metal elements transforms your rustic island from purely country to sophisticated industrial rustic – think modern farmhouse meets urban loft. The contrast between warm wood and cool metal creates visual tension that keeps your island from looking too soft or overly themed. Whether you choose raw steel legs, wrought iron brackets, or aged brass hardware, these accents add perceived durability and a workshop-inspired edge that grounds the entire design.
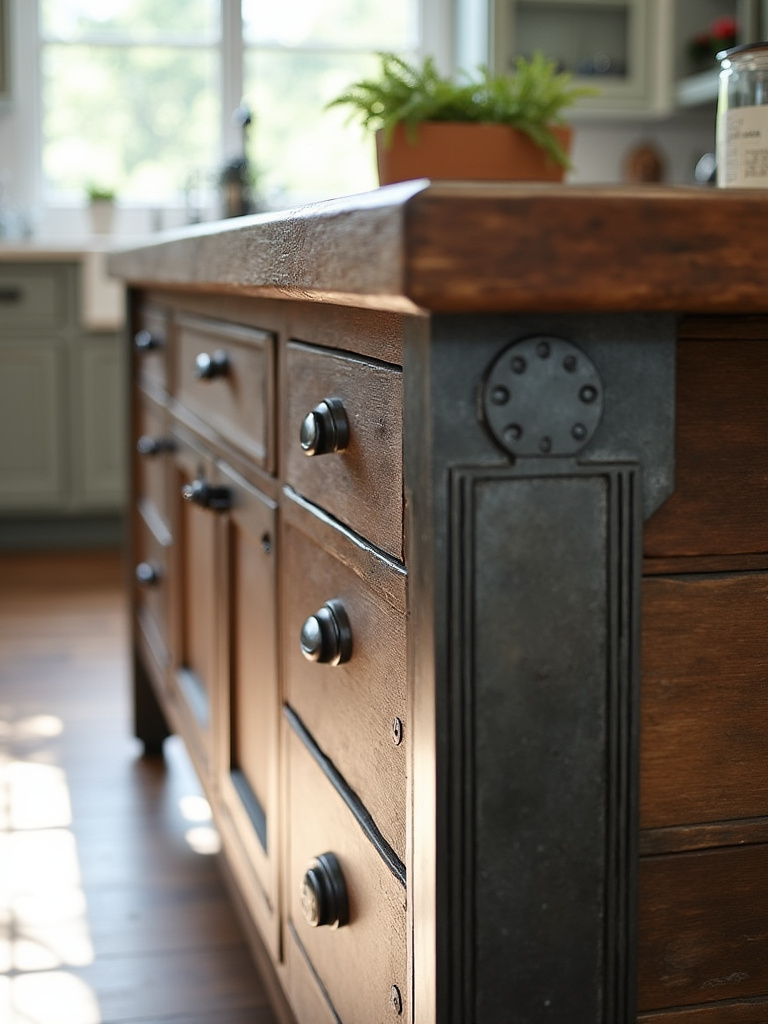
Metal accents also serve double duty by providing functional benefits alongside their aesthetic appeal. Steel pipe footrests give counter stools proper support, iron brackets can hold towels or utensils, and exposed bolts or rivets reinforce the industrial narrative while actually strengthening joints. The key is choosing metals that complement rather than compete – stick with one dominant finish (like matte black) while allowing subtle variations in texture and patina for authentic character.
- Popular metal choices: Raw steel, wrought iron, aged brass, and blackened finishes
- Functional applications: Legs, brackets, hardware, footrests, and decorative rivets
- Design tip: Repeat your chosen metal finish in other kitchen elements for cohesion
“Mixing materials is essential for authentic industrial rustic style,” notes interior designer Sarah Chen. “The metal provides that necessary hard edge against the softness of wood.”
What makes this design special is the way these metal elements prepare the foundation for a durable, functional workspace surface.
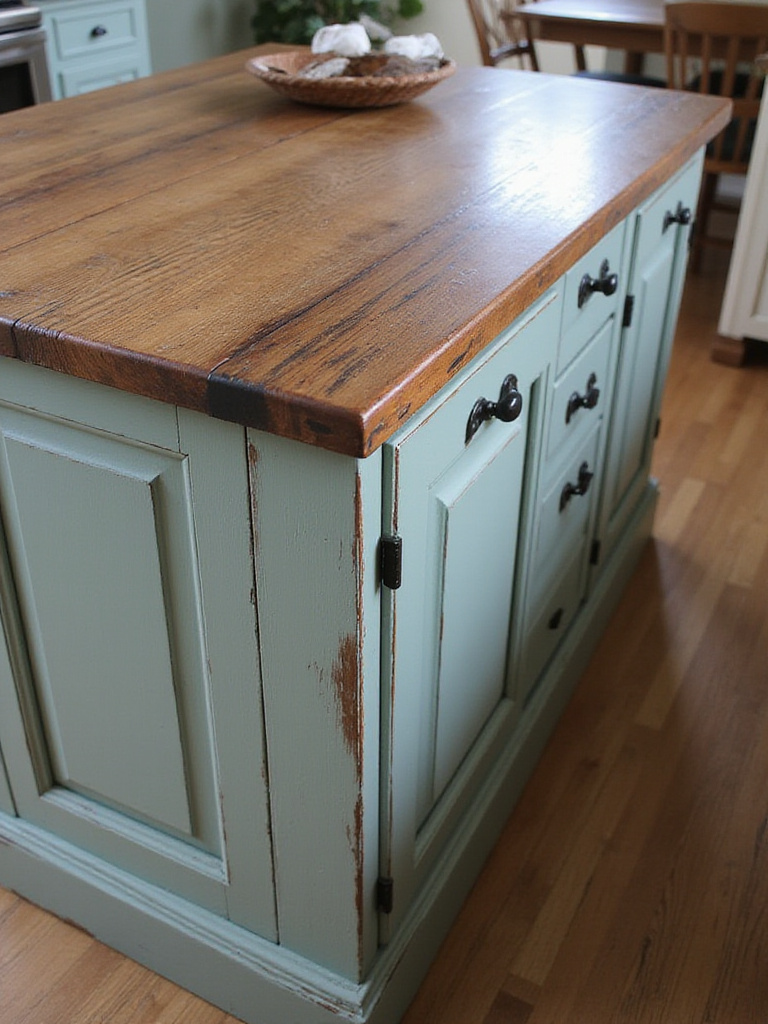
4. Install Butcher Block for Practical Beauty
A butcher block top brings together the best of both worlds – natural beauty and serious functionality for your busiest kitchen tasks. Unlike stone or synthetic surfaces, wood actually improves with age, developing a rich patina from daily use while remaining gentle on your knives and comfortable to work on. The thick, solid construction can handle everything from holiday meal prep to kids’ art projects, making it the perfect surface for a family-focused kitchen island.

The maintenance reality is simpler than many people assume. Monthly applications of food-grade mineral oil keep the surface protected and looking fresh, while minor scratches and dents can often be sanded out and refinished rather than requiring complete replacement. This repairability makes butcher block a smart long-term investment, especially when you consider it typically costs 30-50% less than comparable stone surfaces while offering unique warmth that synthetic materials simply can’t match.
- Top wood choices: Hard maple, oak, and walnut for durability and beauty
- Construction types: End grain (most durable), edge grain (cost-effective), face grain (budget-friendly)
- Maintenance schedule: Monthly oiling, immediate spill cleanup, annual deep conditioning
“For families who actually cook, butcher block provides unmatched functionality while aging beautifully,” emphasizes kitchen designer Rachel Moore.
Beyond the work surface, maximizing your island’s storage potential transforms it from beautiful to indispensable.
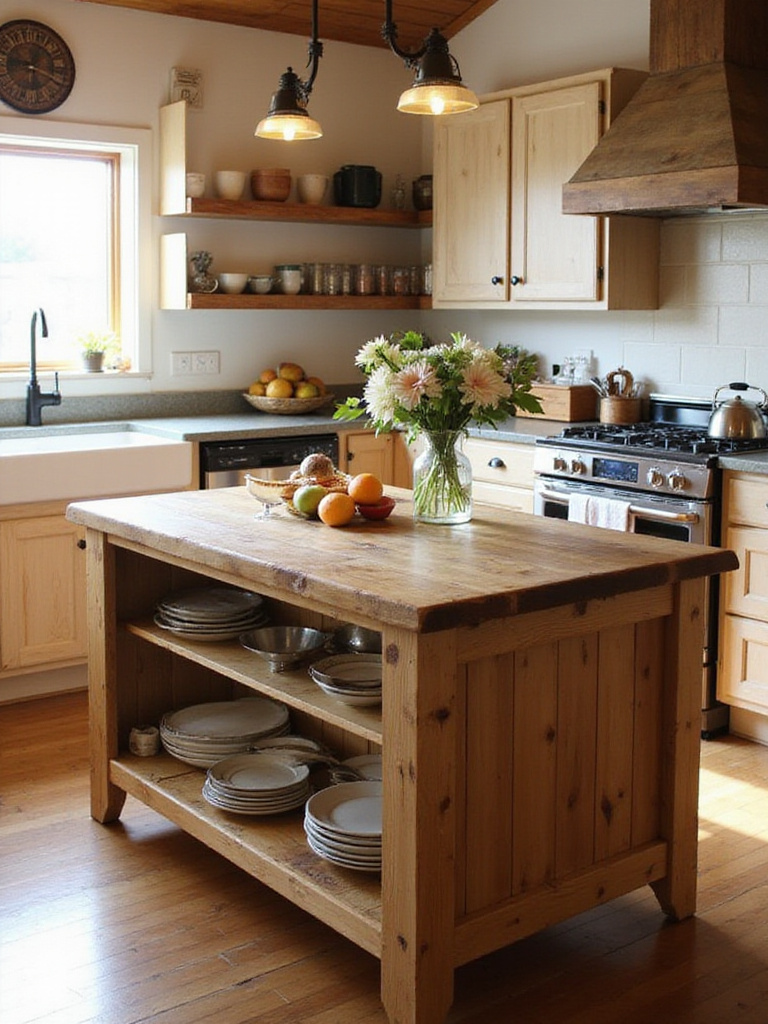
5. Maximize Storage with Smart Solutions
Strategic storage planning turns your rustic island from a pretty focal point into a hardworking kitchen powerhouse. Deep drawers can swallow your heaviest pots and pans, keeping them accessible but out of sight, while open shelving provides the perfect opportunity to display those beautiful serving pieces and vintage finds that reinforce your rustic aesthetic. The key is honestly assessing what you actually need to store and designing accordingly.
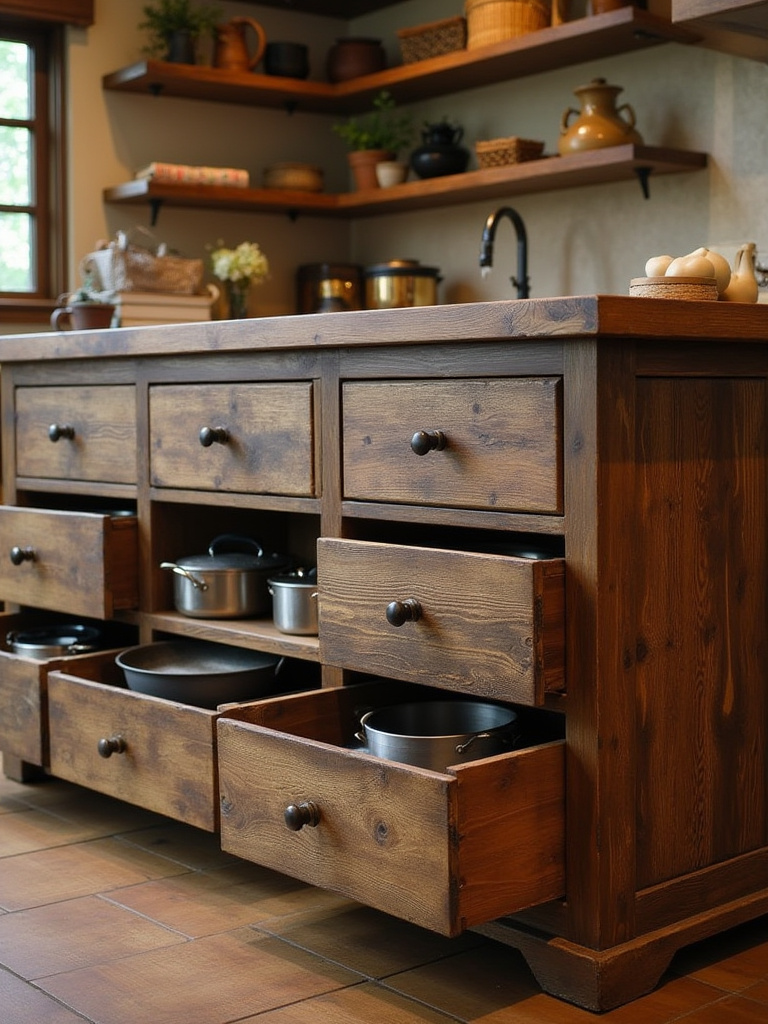
Think beyond basic cabinets to incorporate storage solutions that work for your specific family rhythm. Pull-out spice racks, built-in wine storage, or dedicated spots for small appliances can eliminate countertop clutter while keeping essentials within arm’s reach. Open shelving works beautifully for items you use frequently or want to showcase, but pair it with closed storage for less photogenic necessities like cleaning supplies or bulk pantry items.
- Deep drawer benefits: Perfect for cookware, small appliances, and bulk items
- Open shelving advantages: Display opportunities and easy access to daily essentials
- Organization essentials: Drawer dividers, pull-out trays, and decorative baskets
“Strategic island storage can increase your kitchen’s functionality by 40% while reducing visual clutter,” notes professional organizer Lisa Park.
The styling mistake most people make is focusing only on storage without considering how seating transforms the island into a true gathering space.
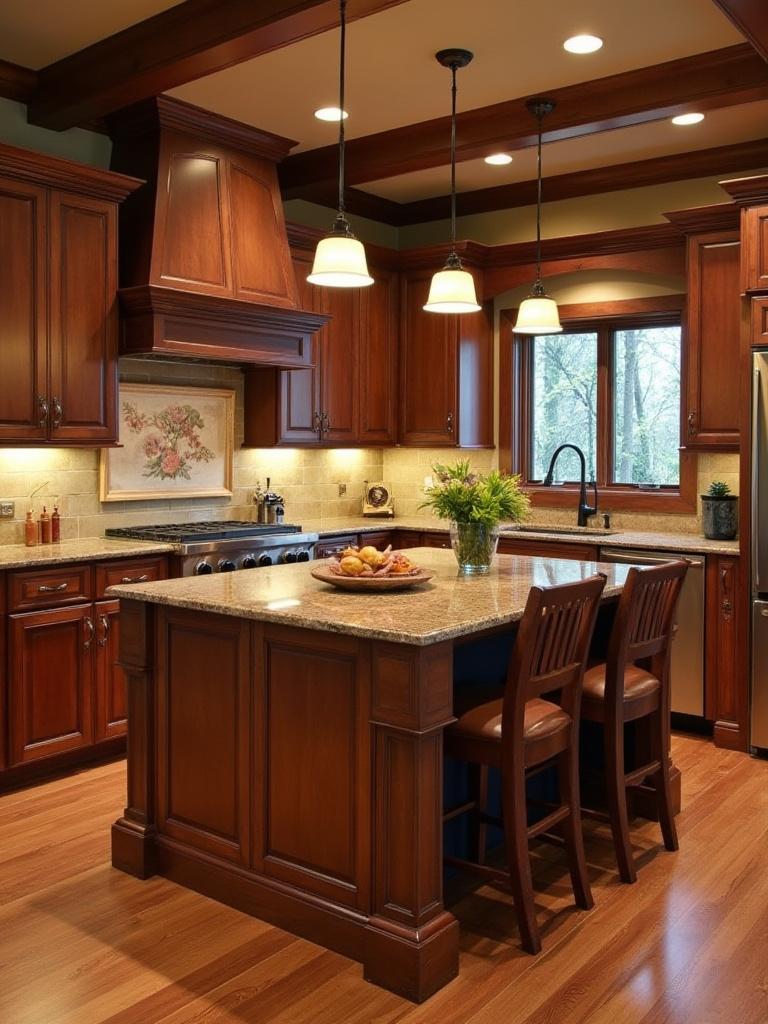
6. Create Gathering Space with Functional Seating
Adding the right seating transforms your island from a work surface into the social hub of your home – that magical spot where morning coffee happens, homework gets tackled, and guests naturally congregate during parties. The key is ensuring you have adequate overhang (at least 12 inches, preferably 15) and choosing stools that complement your rustic aesthetic while actually being comfortable enough for extended use.
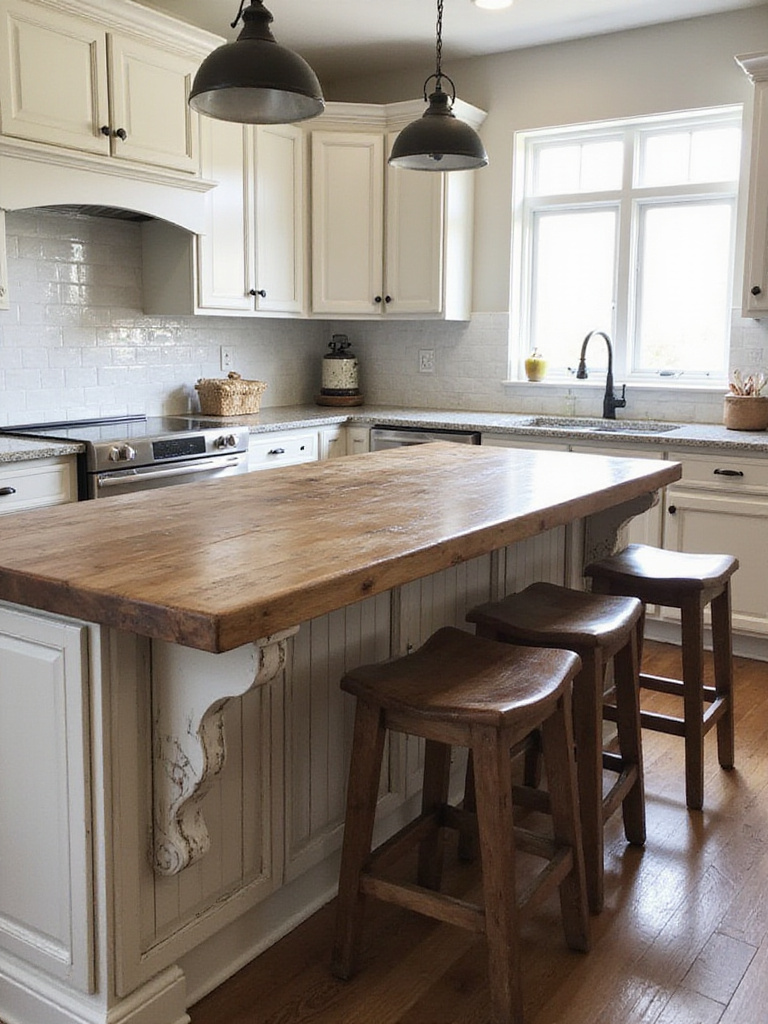
Counter height versus bar height makes a significant difference in both comfort and visual impact. Standard 36-inch counter height with 24-26 inch stools feels more approachable and works better for kids, while 42-inch bar height creates more dramatic presence but requires taller stools that can feel less stable. Consider your family’s needs and the island’s primary functions when making this crucial decision.
- Seating clearance: 24-30 inches width per person, 12-15 inches knee depth minimum
- Style options: Backless for space efficiency, backed for comfort, swivel for convenience
- Material considerations: Wood, metal, upholstered, or mixed materials for rustic appeal
“Kitchen islands with seating have become the new family dinner table,” observes family lifestyle expert Jennifer Walsh. “Design for real life, not just photo opportunities.”
When clients ask us about balancing style with comfort, we always start with getting the island size absolutely right for the space.
7. Size Your Island for Perfect Flow
Getting your island size right is non-negotiable – too large and your kitchen becomes a frustrating obstacle course, too small and you’ve wasted an opportunity for meaningful function and impact. The magic number for walkway clearance is 42 inches minimum, with 48 inches being ideal if you have multiple cooks or heavy traffic areas. These measurements aren’t suggestions; they’re the difference between a kitchen that flows beautifully and one that drives you crazy every single day.
Before falling in love with any particular island design, grab some painter’s tape and mark out the footprint on your floor. Live with it for a few days, opening appliance doors, walking typical traffic patterns, and imagining multiple people using the space simultaneously. This simple exercise will save you from expensive mistakes and ensure your finished island enhances rather than hinders your daily kitchen rhythm.
- Minimum clearances: 36 inches walkway, 42 inches preferred, 48 inches for multiple cooks
- Size guidelines: 24-48 inches wide, 4-8 feet long for most residential kitchens
- Testing method: Tape outline on floor and live with it before committing
“The biggest regret I see is homeowners choosing an island that’s too big for their space,” warns kitchen designer Mark Stevens. “Function must come before form.”
The unexpected pairing that always works is matching your island size to a shape that enhances rather than fights your kitchen’s natural flow patterns.
8. Choose the Right Shape for Your Layout
Your island’s shape should feel like a natural extension of your kitchen’s existing geometry rather than an afterthought dropped into the space. Rectangular islands work beautifully in most layouts and offer maximum surface area, while L-shaped designs can define zones in open-concept spaces and provide distinct areas for prep and seating. The key is understanding how each shape affects traffic flow and work efficiency within your specific kitchen footprint.
Consider how the shape impacts your kitchen’s work triangle – that crucial relationship between sink, stove, and refrigerator. A well-positioned island can actually improve this triangle by providing an intermediate prep zone, while a poorly shaped one can force you to walk around obstacles constantly. Think about your family’s cooking patterns and choose a shape that supports rather than complicates your most common kitchen tasks.
- Rectangular: Most versatile, maximum surface area, works in most layouts
- L-shaped: Great for zone definition, separate prep and seating areas
- Curved: Softer appearance, improved flow, more complex to build
“Shape directly influences how people move through and use your kitchen,” explains space planning expert Carol Martinez. “It’s about creating harmony, not just adding square footage.”
The composition comes together when you position this perfectly shaped island to optimize rather than obstruct your kitchen’s natural traffic patterns.
9. Position for Optimal Kitchen Flow
Strategic island placement can make or break your kitchen’s functionality, regardless of how beautiful the island itself might be. The goal is creating clear pathways that support your family’s natural movement patterns while maintaining easy access to all major appliances and work zones. This means thinking carefully about door swings, traffic from adjacent rooms, and the relationship between your island and existing kitchen elements.
Pay special attention to high-traffic zones like the area in front of your refrigerator, dishwasher, and oven. These spots need generous clearance because appliance doors swing open and people tend to linger while loading or unloading. Position your island to complement these zones rather than compete with them, and always account for multiple people using the kitchen simultaneously during busy periods like holiday cooking or morning rush.
- Critical clearances: 48 inches in front of major appliances, 42 inches for general walkways
- Traffic considerations: Entry points, adjacent room access, work triangle efficiency
- Testing strategy: Use cardboard templates to visualize placement before installation
“The kitchen triangle is still relevant, but now it’s about creating multiple efficient work zones,” notes ergonomic design specialist David Kim.
For those worried about placement perfection, matching your island to existing kitchen elements creates visual continuity that makes positioning feel more natural.
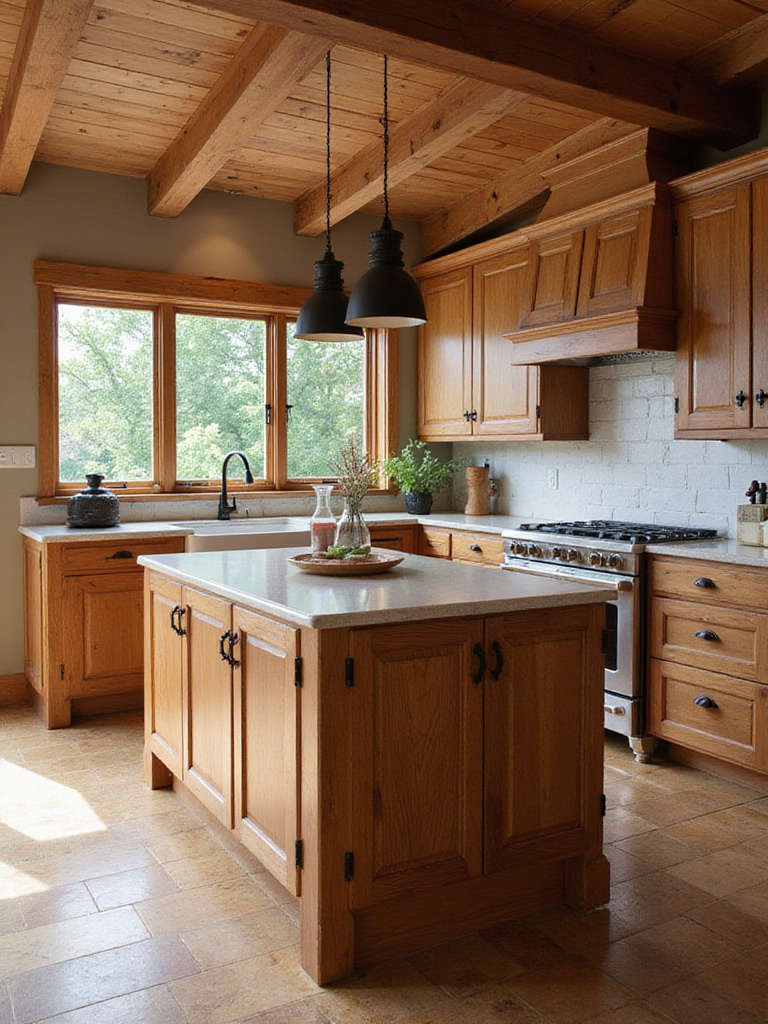
10. Match Your Existing Kitchen Style
Your rustic island should feel like it belongs in your kitchen, not like it wandered in from someone else’s house. This doesn’t mean everything has to match exactly, but there should be clear visual connections through color, material, or style elements that tie the island to your existing cabinetry, countertops, and overall aesthetic. Think of it as adding a new family member who clearly belongs to the same gene pool.
Look for opportunities to echo existing elements while introducing complementary contrasts. If your cabinets are painted white, consider a rustic island with white accents and natural wood tones. If you have granite countertops, repeating that material on your island creates instant cohesion. The hardware is often the easiest place to create connections – matching your island pulls to existing cabinet hardware immediately establishes visual relationships.
- Color coordination: Echo existing tones or introduce complementary contrasts
- Material connections: Repeat countertop materials, wood species, or metal finishes
- Hardware harmony: Match or coordinate pulls, knobs, and fixtures for unity
“A successful island feels like it was always meant to be there,” emphasizes interior designer Rachel Foster. “It should enhance your existing style, not fight it.”
We challenged ourselves to reimagine how budget-conscious families can achieve this custom look without the custom price tag.
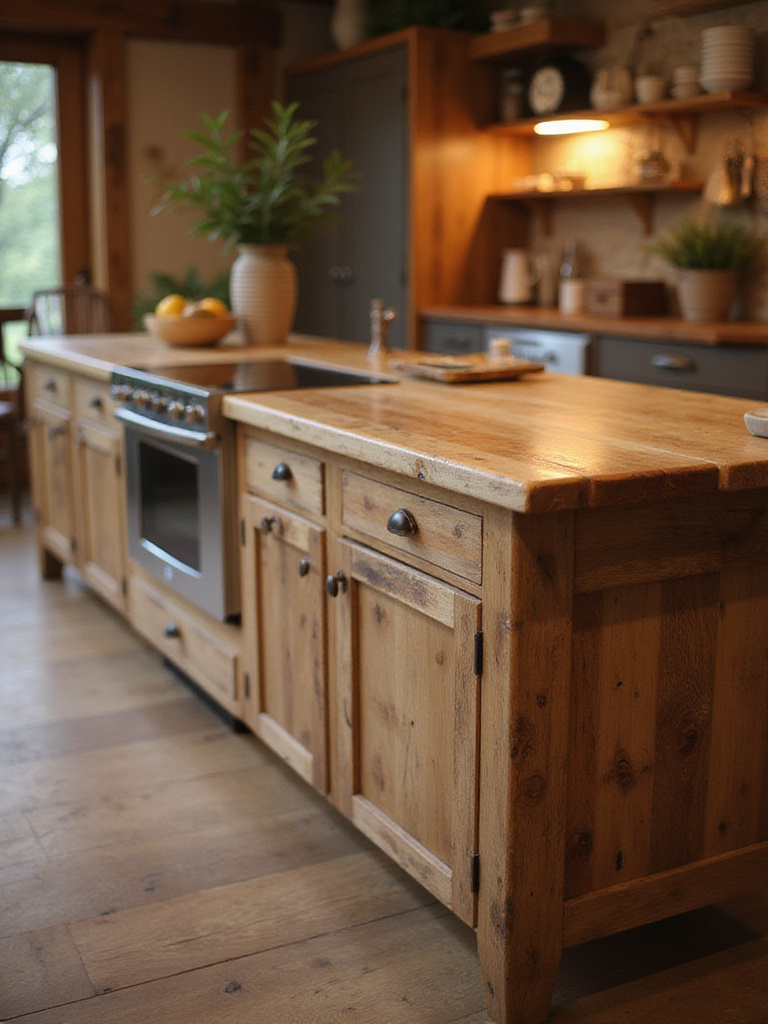
11. Build Your Own Island for Custom Results
Creating your own rustic island opens up possibilities that simply aren’t available in retail options while keeping costs manageable for busy families. With basic woodworking skills and a weekend or two, you can build something perfectly sized for your space and customized for your specific needs. The key is starting with a solid plan and realistic expectations about your skill level and available time.

Consider repurposing existing furniture as your starting point – an old dresser or cabinet can provide built-in storage and a sturdy foundation that just needs a new top and some cosmetic updates. This approach cuts construction time significantly while giving you a head start on that authentic, collected look that makes rustic style so appealing. Focus on sturdy construction over perfect finish work; rustic style is forgiving of minor imperfections.
- Budget savings: 50-70% less than comparable retail options
- Customization benefits: Perfect size, specific storage needs, unique style elements
- Skill requirements: Basic carpentry, measuring, and finishing techniques
“DIY rustic projects are incredibly forgiving – imperfections just add to the character,” encourages woodworking instructor Mike Torres.
After months of sourcing and curation, we’ve discovered that finding the right used piece can be even more budget-friendly than building from scratch.
12. Source Quality Used Islands for Restoration
Hunting for a used island or repurposable furniture piece combines treasure hunting with practical decorating, often yielding unique results at fraction of retail cost. Look beyond obvious kitchen islands to consider sturdy dressers, workbenches, or even old counters that can be transformed into perfect rustic centerpieces. The key is seeing potential in solid construction and good bones, even when the current finish or style doesn’t match your vision.
Online marketplaces, estate sales, and architectural salvage yards are goldmines for restoration candidates. Focus on pieces with solid wood construction and stable joints – surface issues like scratched finishes or outdated hardware are easily addressed, but structural problems can be costly and time-consuming to repair. Don’t be afraid to negotiate, especially for pieces that need obvious work.
- Best sources: Estate sales, online marketplaces, architectural salvage, antique shops
- Quality indicators: Solid wood construction, stable joints, good proportions
- Restoration potential: Surface refinishing, hardware updates, top replacement
“The best restoration candidates have great bones and terrible finishes,” notes furniture flipper Sarah Chen. “That’s where you find the best deals.”
The artisans behind these restored pieces often use paint and stain techniques that transform ordinary furniture into rustic showstoppers.
13. Master Paint and Stain Techniques
The right finish can transform even basic lumber into a piece with serious rustic character, making paint and stain selection crucial for achieving your desired aesthetic. Layered paint techniques, where you apply multiple colors and selectively sand through to reveal underlying layers, create authentic aging that new pieces simply can’t replicate. The key is building up these layers gradually and distressing strategically for natural-looking wear patterns.
Consider the kitchen environment when selecting finishes – your island will face spills, heat, and constant use, so durability matters as much as appearance. Water-based polyurethane topcoats provide excellent protection while maintaining the authentic look of your carefully crafted base finish. Don’t skip this protective step; even the most beautiful paint job won’t survive kitchen life without proper sealing.
- Layering technique: Base color, accent color, selective sanding for authentic aging
- Durability essentials: Proper primer, quality paint, protective topcoat rated for kitchens
- Color inspiration: Sage green, barn red, weathered white, natural wood tones
“The magic happens in the details – how you distress and where you add wear marks determines authenticity,” explains decorative painter Lisa Morgan.
What surprises clients most is how adding the right hardware and details can elevate even a simple painted piece into something truly special.
14. Enhance with Unique Hardware and Details
Hardware serves as the jewelry of your rustic island, and choosing pieces with character makes all the difference between generic and genuinely charming. Look beyond standard cabinet pulls to consider bin pulls, leather straps, or even simple wooden pegs that reinforce the handcrafted aesthetic. The scale matters too – rustic islands can handle more substantial hardware than delicate contemporary pieces.
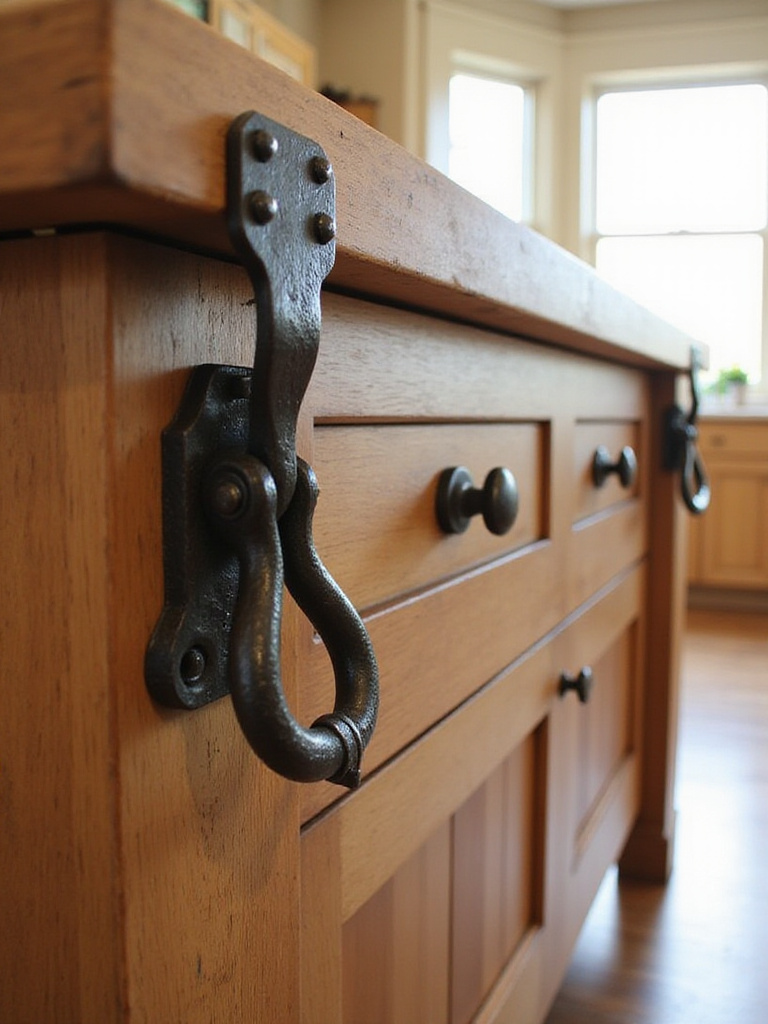
Architectural details like corbels, exposed bolts, or decorative brackets add visual weight and authenticity that transforms a basic island into something that looks custom-built. These elements don’t have to be purely decorative; functional details like a towel bar made from iron pipe or hooks for utensils combine practicality with style. The key is choosing details that feel intentional rather than applied as an afterthought.
- Hardware options: Bin pulls, leather straps, forged iron, aged brass, wooden pegs
- Architectural details: Corbels, brackets, exposed bolts, decorative clavos
- Scale considerations: Larger islands can handle more substantial hardware elements
“Hardware is where you can really inject personality without major expense,” notes kitchen designer Tom Richardson.
The heritage technique gets a contemporary update through incorporating carefully chosen vintage elements that add instant history.
15. Incorporate Vintage Elements for Character
Weaving vintage finds into your island design creates layers of history and visual interest that new pieces simply cannot replicate. This might mean using an antique workbench as your island base, incorporating salvaged architectural elements like old corbels or tin panels, or simply styling around your island with carefully chosen vintage accessories. The key is selecting pieces that feel authentic to the rustic aesthetic rather than randomly collected.
Focus on items with good structural integrity and interesting patina – the wear patterns and aging should feel natural rather than artificially distressed. Vintage industrial elements like factory carts, old scales, or workshop tools can provide both function and character when integrated thoughtfully. Remember that vintage doesn’t mean fragile; many older pieces were built to last and can handle modern kitchen demands beautifully.
- Vintage base options: Workbenches, factory carts, old dressers, industrial tables
- Architectural salvage: Corbels, tin panels, old hardware, reclaimed brackets
- Styling accessories: Vintage scales, crocks, industrial lighting, old tools
“Authentic vintage pieces bring soul to a space in ways that reproductions never can,” emphasizes antique dealer Maria Santos.
The environmental story behind vintage pieces becomes even more compelling when you illuminate them with lighting that enhances their natural character.
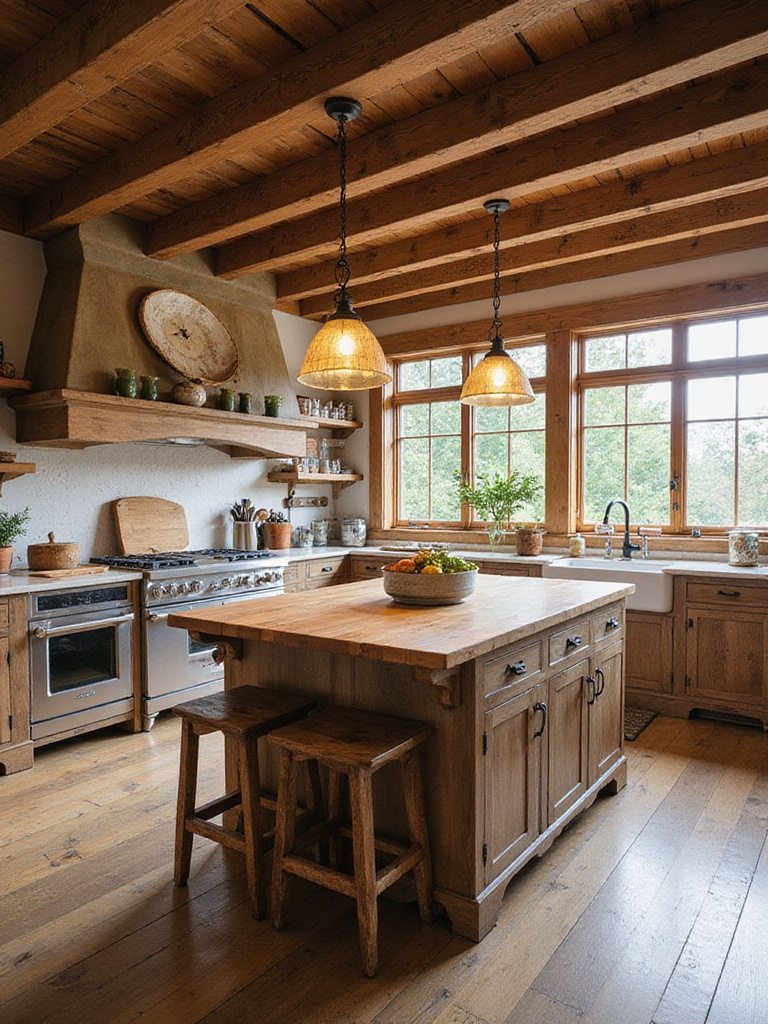
16. Light Your Island for Function and Mood
Strategic lighting transforms your rustic island from a daytime workspace into an evening gathering spot while providing essential task illumination for safe food preparation. The key is layering different types of light – focused task lighting for work, ambient lighting for mood, and accent lighting to highlight the island’s rustic character. Pendant lights remain the most popular choice, but consider the scale and style carefully to complement rather than overwhelm your island.
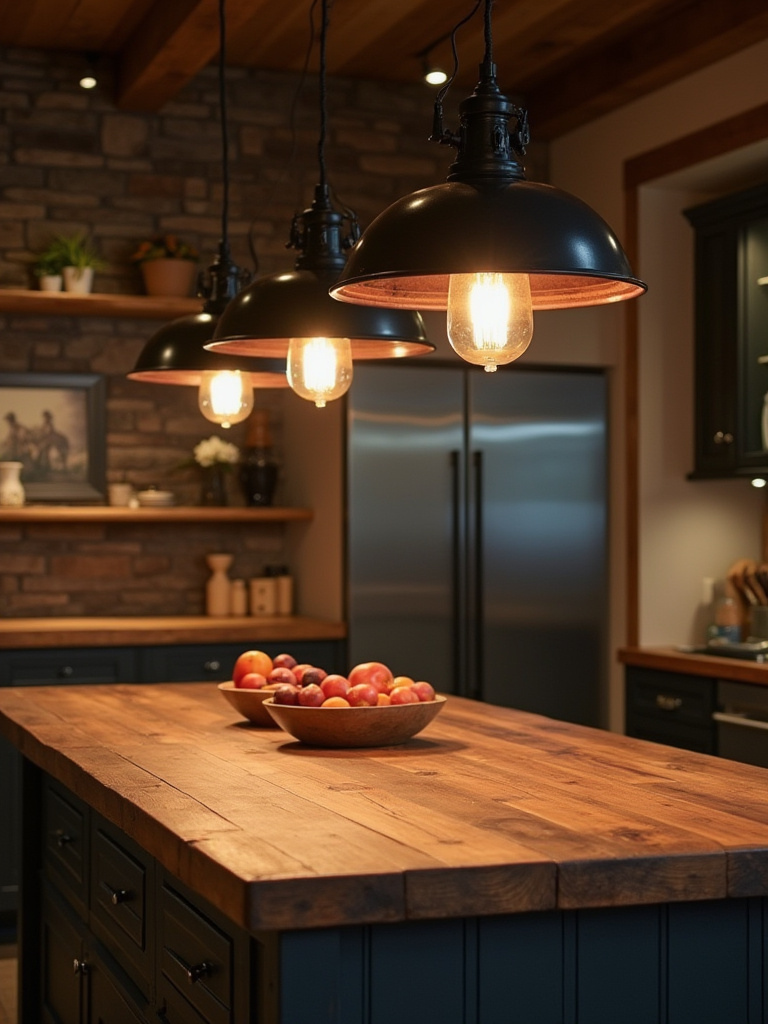
Height matters significantly for both function and aesthetics. Hang pendants 30-36 inches above the island surface for optimal task lighting without blocking sight lines across the kitchen. Choose warm light temperatures (2700K-3000K) that enhance the cozy, inviting feel essential to rustic style, and install dimmers to adjust the mood from bright work lighting to soft ambient glow for entertaining.
- Pendant placement: 30-36 inches above surface, evenly spaced for uniform coverage
- Light temperature: Warm white (2700K-3000K) for cozy rustic atmosphere
- Control options: Dimmers for versatility, separate switches for layered lighting
“Lighting is your opportunity to enhance the rustic character while ensuring the island is truly functional,” notes lighting designer Carol Martinez.
The mood shifts dramatically when you add carefully chosen accessories that complete the rustic story your island tells.
17. Style Your Island with Rustic Accessories
Thoughtful styling transforms your island from a functional piece into a curated focal point that reinforces your rustic aesthetic while maintaining practical usability. The key is selecting accessories that serve double duty – beautiful enough to enhance the design but functional enough to earn their place in a working kitchen. Think wooden cutting boards that can lean against a backsplash, ceramic crocks that hold utensils, or vintage-style bowls that display fresh fruit.
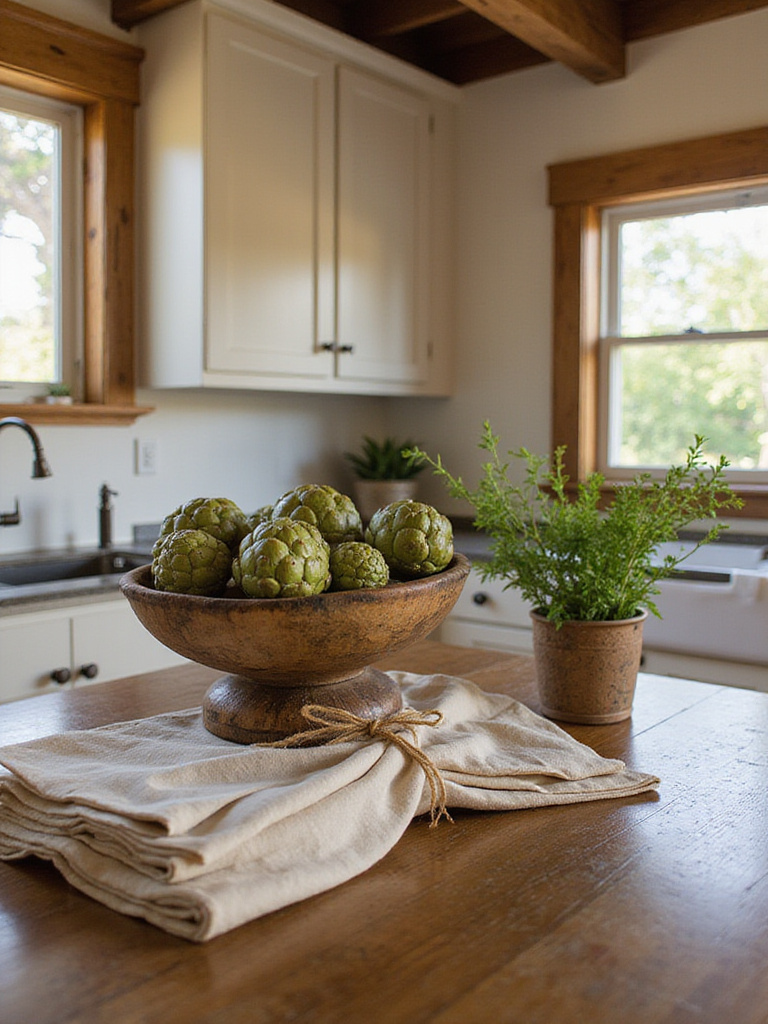
Create visual interest through varying heights, textures, and groupings while keeping the overall composition balanced and uncluttered. Use the rule of odd numbers for groupings, and don’t be afraid to incorporate natural elements like potted herbs or seasonal produce that reinforce the connection to farm-fresh, rustic living. Remember that less is often more – a few well-chosen pieces create more impact than a crowded surface.
- Functional styling: Cutting boards, utensil crocks, fruit bowls, herb pots
- Texture variety: Wood, ceramic, metal, natural fibers for visual interest
- Grouping strategy: Odd numbers, varied heights, balanced composition
“The best island styling looks effortless but serves real purposes in daily kitchen life,” advises styling expert Jennifer Walsh.
The finishing touch that elevates the entire look is establishing a maintenance routine that preserves your island’s beauty for years of family memories.
18. Maintain Your Island’s Beauty Long-Term
Protecting your rustic island investment requires consistent but simple maintenance that preserves its character while ensuring it remains functional for years of family life. The key is understanding your specific finish and following appropriate care routines – what works for painted surfaces differs significantly from caring for natural wood or butcher block tops. Establish daily habits like immediate spill cleanup and weekly routines for deeper cleaning and conditioning.
For wood surfaces, regular applications of appropriate oils or waxes maintain protection against moisture and wear while allowing the natural aging process to continue. Painted or stained finishes benefit from gentle cleaning with pH-neutral products that won’t strip the carefully crafted patina. The goal is preservation, not perfection – some additional wear and patina over time actually enhances the authentic rustic character.
- Daily care: Immediate spill cleanup, gentle wiping with soft cloths
- Weekly routine: Deeper cleaning, oil or wax application as needed
- Protective measures: Coasters, trivets, cutting boards for surface protection
“Consistent gentle care preserves character while preventing damage that requires major refinishing,” advises furniture restoration expert Mike Torres.
Unlike conventional options, this maintenance approach actually improves the island’s character while protecting your investment in creating a true family gathering space.
19. Create a Cozy Nook Around Your Island
Extending the comfort zone around your island creates a true family hub where people naturally want to linger, transforming your kitchen from a purely functional space into the heart of your home. This involves thoughtfully arranging seating, adding soft textures through cushions or throws, and creating intimate lighting that makes the area feel separate from the working kitchen zones. The goal is establishing a spot that invites conversation and connection.
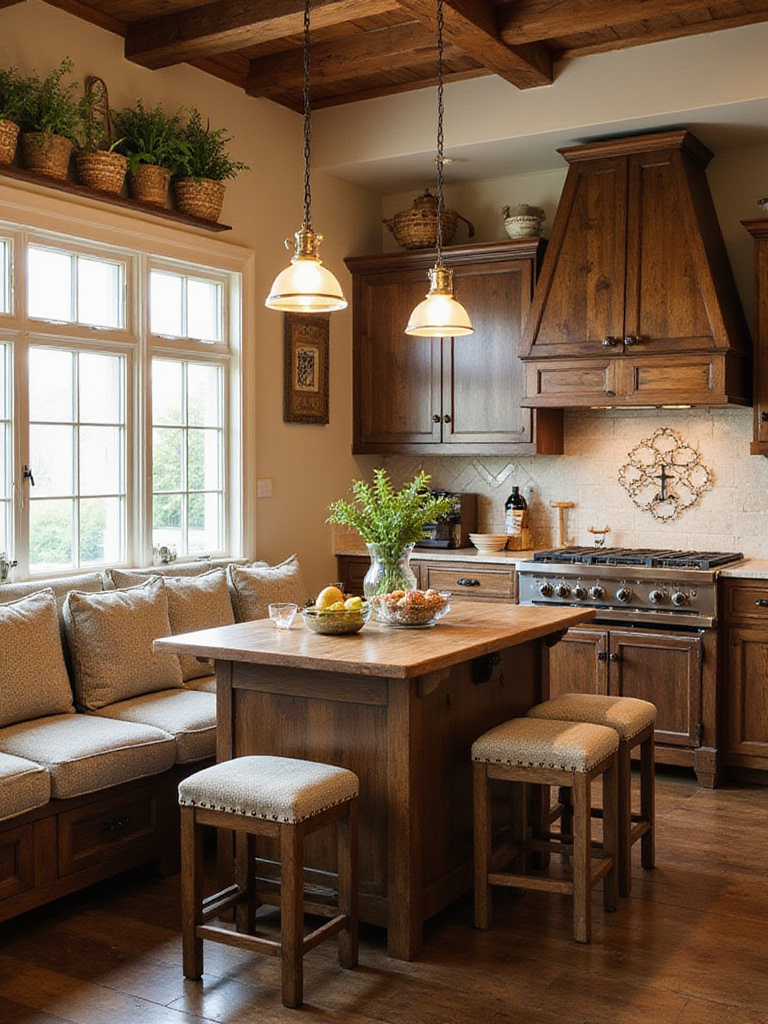
Consider the traffic flow and sight lines when creating your nook – you want it to feel cozy without blocking essential kitchen pathways or creating bottlenecks during busy cooking periods. Incorporate storage solutions like built-in benches with hidden compartments or nearby shelving for books, games, or other items that support the activities likely to happen in this space. Remember that comfort is key; if the seating isn’t genuinely inviting, the nook won’t fulfill its purpose as a gathering spot.
- Seating options: Built-in banquettes, comfortable stools, small table and chairs
- Comfort elements: Cushions, throws, appropriate lighting, storage access
- Traffic considerations: Clear pathways, sight lines, functional separation from work zones
“The kitchen island has become the new family room for many households,” observes family lifestyle expert Sarah Chen. “Design it to support real life, not just cooking.”
Conclusion
Creating the perfect rustic kitchen island is about so much more than following a checklist – it’s about understanding how thoughtful design choices come together to create a piece that serves your family’s real needs while adding genuine character to your kitchen. From selecting reclaimed wood with authentic history to incorporating vintage finds that tell their own stories, each decision contributes to building something truly unique that reflects your personal style and supports your daily rhythms.
The beauty of rustic style lies in its forgiving nature and its celebration of imperfection. Whether you’re building from scratch on a budget, restoring a treasured find, or simply updating an existing piece with new finishes and hardware, the key is embracing the process and making choices that feel authentic to your vision. Remember that the best rustic islands develop character over time through use and gentle aging – they’re meant to be lived with, not preserved under glass.
Your rustic kitchen island awaits, ready to become the gathering place where morning coffee turns into extended conversations, where homework happens alongside dinner prep, and where friends naturally congregate during parties. Take these tips, adapt them to your specific space and needs, and create something that will serve as the heart of your home for years to come. The most important ingredient isn’t perfect execution – it’s the love and intention you bring to the process.